
To build a curved range hood, you need to carefully measure and shape the materials before assembling them together. Allow me to guide you through the step-by-step process of building a stellar curved range hood that will enhance the aesthetics of your kitchen.
Whether you are a DIY enthusiast or a seasoned designer, this comprehensive guide will provide you with all the necessary information to create a sleek and functional curved range hood that fits perfectly into your kitchen decor. Let’s dive in and get started on this exciting project!
Choosing The Right Materials For Your Curved Range Hood
Find the perfect materials for your curved range hood with these helpful tips. Discover the best options to ensure a sturdy and aesthetically pleasing build. Choose wisely for a functional and stylish addition to your kitchen.
Materials That Are Suitable For A Curved Range Hood:
- Stainless steel: Highly popular due to its durability, heat resistance, and sleek appearance. It is resistant to corrosion and can withstand high temperatures, making it perfect for a curved range hood.
- Copper: Known for its unique and luxurious look, copper is an excellent choice for a curved range hood. It also has natural antimicrobial properties, reducing the growth of bacteria.
- Glass: Glass range hoods provide a contemporary and elegant touch to any kitchen. They are easy to clean and offer a smooth surface, making them an ideal option for a curved design.
- Wood: If you prefer a more rustic or traditional aesthetic, wood range hoods are a great choice. They can be customized to match your kitchen cabinetry and offer a warm and inviting feel.
- Composite materials: Composite materials, such as fiberglass or carbon fiber, are lightweight and durable options for a curved range hood. They are resistant to heat and moisture, making them a practical choice for kitchen environments.
Factors To Consider When Selecting Materials For Your Range Hood:
- Heat resistance and durability: The material you choose should be able to withstand high temperatures without warping or discoloration. It should also be durable enough to handle regular use and exposure to cooking fumes.
- Aesthetic appeal and design flexibility: Consider the overall style of your kitchen and choose a material that complements the existing décor. Additionally, select a material that offers design flexibility, allowing for a customized curved range hood that suits your preferences.
- Easy maintenance and cleaning: Look for materials that are easy to clean and maintain, as range hoods tend to accumulate grease and cooking residues. Avoid materials that require extensive maintenance or may deteriorate with regular cleaning.
- Environmental impact: Consider eco-friendly materials or options made from recycled content to minimize your carbon footprint. Choosing materials with sustainability in mind can contribute to a greener kitchen space.
- Cost: Evaluate the cost of different materials and consider your budget when making your selection. Keep in mind that higher-quality materials may be more expensive initially but can offer better longevity and value in the long run.
Remember, choosing the right materials for your curved range hood is crucial for both function and aesthetics. Consider the factors mentioned above and select a material that aligns with your requirements and personal style.

Credit: www.pinterest.com
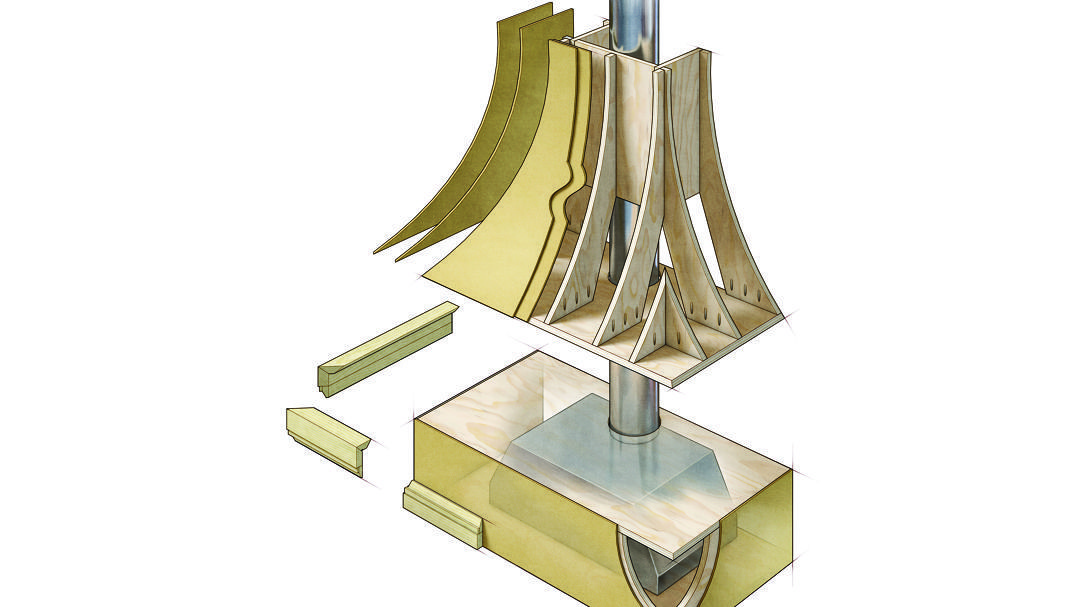
Measuring And Cutting The Curved Panels
Learn how to measure and cut curved panels for a stunning range hood build. This step-by-step guide will help you create a unique and impressive focal point in your kitchen.
Taking Accurate Measurements For Your Curved Range Hood Panels
- Before you begin cutting the curved panels for your range hood, it’s important to take accurate measurements to ensure a proper fit. Here are some steps to follow:
- Measure the width and height of your range hood opening, making note of any existing curves or angles.
- Use a flexible measuring tape to accurately measure the curvature of the range hood. Gently bend the tape along the curve and record the measurement.
- Double-check your measurements to ensure they are correct before proceeding to the cutting stage.
Tools And Techniques For Cutting Curved Panels
- Cutting curved panels for your range hood requires specific tools and techniques to achieve precise and clean cuts. Here are some options to consider:
- Jigsaw: A jigsaw is a versatile power tool that allows you to cut curves easily. Choose a fine-toothed blade for smoother cuts and take your time to follow your marked lines accurately.
- Circular saw: While a circular saw is not typically used for cutting curved panels, it can still be used by making multiple straight cuts along the curve and then sanding down the edges to create a smooth, rounded shape.
Employing A Router For Precision Cuts
- If you want to achieve more precise cuts for your curved range hood panels, using a router can be a great option. Here’s how to do it:
- Choose a router bit suitable for curved cuts, such as a flush trim or pattern bit.
- Attach the router bit to your router and adjust the depth of cut according to your requirements.
- Secure the panel you want to cut and use a guide or template to follow the desired curve.
- Move the router along the edges of the panel, guiding it smoothly to achieve clean cuts.
Tips For Ensuring Straight And Clean Cuts
- To ensure your cuts are straight and clean, follow these helpful tips:
- Use a sharp blade or router bit to minimize any tear-out or jagged edges.
- Take your time and go slow when cutting along curves to maintain precision.
- Secure the panels properly to prevent them from moving or shifting during the cutting process.
- Make sure to wear protective gear, such as goggles and gloves, when using power tools.
- Practice on scrap pieces of material before cutting the actual panels to familiarize yourself with the tools and techniques.
Remember, accurate measurements and precise cutting techniques are crucial in building a curved range hood. With the right tools and careful execution, you can achieve stunning results for your kitchen. So, let’s start getting creative and transform your range hood into an eye-catching centerpiece for your culinary haven.
Assembling And Joining The Curved Range Hood Panels
Discover the step-by-step process of assembling and joining the curved range hood panels. Learn all the techniques and tips needed to build your own curved range hood with ease.
With just a few expert techniques and a little bit of effort, you can assemble and join the curved range hood panels for a stunning final product. In this section, we’ll cover the essential steps to ensure a secure and seamless result.
Preparing The Panels For Assembly:
- Start by laying out all the panels in the correct order to ensure a smooth installation.
- Use a measuring tape to confirm that all the panels are aligned properly.
- Mark each panel with a reference point to make it easier to join them together later.
- Check for any imperfections or damage on the panels and address them before beginning the assembly process.
Techniques For Joining The Curved Panels Securely:
- One option for joining the curved panels is by using screws or nails. This method provides a strong and stable connection.
- Place the panels together in the desired curved shape and use a drill to create pilot holes for the screws or nails.
- Insert the screws or nails through the pilot holes, making sure they penetrate both panels evenly.
- Repeat this process along the length of the curved range hood until all panels are securely joined.
Applying Adhesives Or Sealants:
- Another technique for joining curved panels is by applying adhesives or sealants.
- Choose a high-quality adhesive or sealant that is specifically designed for wood or metal bonding.
- Apply the adhesive or sealant along the edges of the panels that will be joined together.
- Press the panels firmly together and allow the adhesive or sealant to dry according to the manufacturer’s instructions.
Sanding And Smoothing The Seams For A Seamless Finish:
- After joining the curved panels, it’s important to sand and smooth the seams for a flawless final result.
- Start by using coarse sandpaper to remove any rough edges or bumps along the seams.
- Gradually switch to finer grit sandpaper to achieve a smooth and seamless finish.
- Take your time and make sure to sand evenly across the entire seam for a professional look.
By following these steps, you’ll be well on your way to assembling and joining the curved range hood panels securely. Whether you choose to use screws or nails, adhesives or sealants, or a combination of both, the end result will be a beautifully crafted curved range hood that adds elegance to your kitchen space.
Designing The Ventilation System For Your Curved Range Hood
Designing the ventilation system for a curved range hood requires careful planning and consideration. This guide will help you navigate the process and create an efficient and aesthetically pleasing kitchen ventilation solution.
Proper ventilation is essential for any kitchen, especially when it comes to a curved range hood. Ensuring an efficient ventilation system will not only improve air quality but also eliminate unwanted cooking odors and prevent the buildup of harmful pollutants.
In this section, we will delve into the importance of proper ventilation, discuss the optimal placement of the ventilation system, explore the right size and type of ductwork to use, and guide you through the installation and connection of ventilation system components.
We will also touch upon centrifugal and axial fan selection and installation to make your curved range hood truly effective.
Understanding The Importance Of Proper Ventilation:
- Efficient ventilation helps remove grease, steam, smoke, and odors from the kitchen.
- It improves indoor air quality, creating a healthier and more comfortable cooking environment.
- Proper ventilation prevents the accumulation of harmful gases, such as carbon monoxide.
- It reduces the risk of mold and mildew growth, which can lead to health issues.
Determining The Optimal Placement Of The Ventilation System:
- Locate the range hood close to the cooking surface to capture airborne contaminants efficiently.
- Install the ventilation system at a height where it effectively captures steam, smoke, and odors.
- Consider the kitchen layout and the hood’s ability to draw in air from various angles.
- Evaluate the proximity to external walls or the roof for easier ductwork installation.
Choosing The Right Size And Type Of Ductwork:
- Calculate the required airflow based on the size of your cooking area.
- Consider using round ducts, as they provide better airflow compared to rectangular ducts.
- Opt for smooth, rigid ducts to minimize airflow restrictions and noise.
- Insulate the ductwork to prevent condensation and energy loss.
Installing And Connecting The Ventilation System Components:
- Follow the manufacturer’s instructions for installing the range hood and ductwork.
- Ensure a secure and airtight connection between the range hood and the ductwork.
- Use appropriate connectors and sealants to prevent air leaks.
- Test the system’s functionality by turning it on and checking for proper airflow.
Centrifugal Or Axial Fan Selection And Installation:
- Centrifugal fans are generally more powerful and suitable for larger kitchens.
- Axial fans are quieter and suitable for smaller kitchens or where noise is a concern.
- Consider the available space and the specific requirements of your kitchen.
- Follow the manufacturer’s guidelines for fan installation and wiring.
Now that you understand how to design the ventilation system for your curved range hood, you are one step closer to achieving a well-functioning and aesthetically pleasing kitchen. Remember to prioritize proper airflow and efficient removal of air contaminants for a healthier cooking environment.
Installing The Curved Range Hood In Your Kitchen
Create an elegant and efficient cooking space by installing a range hood in your kitchen. Find out how to build one with these expert tips and step-by-step instructions. Upgrade your kitchen with style and functionality today.
So, you’ve decided to add a curved range hood to your kitchen to enhance both the aesthetics and functionality of your cooking space. Congratulations! Now, let’s dive into the steps involved in installing this essential kitchen appliance. By following these guidelines, you can ensure a smooth installation process and enjoy the benefits of a properly mounted and connected curved range hood in no time.
Preparing The Installation Area:
Before installing your curved range hood, it is crucial to prepare the installation area to ensure a secure and stable mounting. Consider the following steps:
- Start by measuring the height at which you want the range hood to be positioned. This will ensure the proper clearance above your cooking surface.
- Locate the studs in the wall or ceiling where you plan to mount the range hood. Mark them clearly for reference during installation.
- Clear the area surrounding the installation site of any obstructions, such as cabinets or decor items, to provide adequate space for the range hood.
Mounting The Range Hood To The Wall Or Ceiling:
Mounting your curved range hood correctly is essential to ensure its stability and functionality. Follow these steps for a successful installation:
- Position the range hood against the wall or ceiling, aligning it with the marked studs.
- Use a level to ensure the range hood is straight. Adjust as necessary.
- Mark the screw holes on the wall or ceiling through the mounting brackets provided with the range hood.
- Pre-drill holes at the marked spots and attach the mounting brackets securely using appropriate screws for your wall type.
- Lift the range hood and hook it onto the mounting brackets. Double-check the stability before moving on to the next step.
Connecting The Range Hood To The Ventilation System:
Properly connecting your curved range hood to the ventilation system is crucial for effective odor and smoke extraction. Follow these steps:
- Locate the ventilation duct in your kitchen that connects to the outside or an exhaust system.
- Install a vent cap on the exterior wall or roof if necessary.
- Attach the ductwork to the range hood using appropriate connectors, ensuring a secure and airtight fit.
- Use foil tape or mastic sealant to seal any joints or connections to prevent air leaks.
Testing The Functionality And Performance Of The Range Hood:
It’s time to make sure your newly installed curved range hood is working properly. Perform the following tests:
- Turn on the range hood and check if the fan is functioning at different speed settings.
- Test the lighting features of the range hood to ensure adequate brightness over your cooking surface.
- Use a smoke source, such as an extinguished match, near the range hood to confirm that the ventilation system is effectively removing smoke and odors.
Ensuring Proper Airflow And Filtration:
To maximize the efficiency of your curved range hood, it’s important to ensure proper airflow and filtration. Consider the following measures:
- Clean or replace the range hood filters regularly to maintain their effectiveness in capturing grease and odors.
- Check the ventilation ducts for any obstructions or blockages, ensuring smooth airflow.
- Consider installing a carbon filter or recirculating kit if your curved range hood is not vented to the outside, to enhance filtration.
By following these steps and guidelines, you can successfully install a curved range hood in your kitchen, elevating both its aesthetics and functionality. Enjoy the enhanced cooking experience and improved air quality that this appliance brings to your culinary haven.
Finishing And Customizing Your Curved Range Hood
Discover the essential steps for building a curved range hood and learn the art of finishing and customizing it to elevate your kitchen’s style. From materials selection to installation techniques, this guide provides practical tips for creating a unique and functional centerpiece for your cooking space.
Sanding, Priming, And Painting The Range Hood:
Before adding any decorative elements or finishes, it’s important to properly prepare and paint your curved range hood. Here’s a step-by-step guide to help you achieve a flawless finish:
- Start by sanding the range hood using fine-grit sandpaper. This will help smooth out any rough edges or imperfections on the surface.
- After sanding, wipe down the range hood with a damp cloth to remove any dust or debris.
- Apply a coat of primer to the range hood. This will create a smooth base for the paint and ensure better adhesion.
- Once the primer is dry, choose a high-quality paint that is suitable for metal surfaces. Using a paint specifically designed for range hoods will provide a durable and heat-resistant finish.
- Apply the first coat of paint using a brush or a sprayer, making sure to cover the entire surface evenly. Allow the paint to dry before applying subsequent coats.
- Depending on the color and finish you desire, apply additional coats of paint until you achieve the desired look. Remember to allow each coat to dry properly before applying the next one.
- To protect the painted surface and enhance its durability, consider applying a clear protective topcoat. This will help guard against scratches and stains and ensure a long-lasting finish.
Adding Decorative Elements And Finishes:
Once you have finished painting your range hood, it’s time to add those personal touches that will make it truly unique. Here are some ideas for adding decorative elements and finishes:
- Install decorative panels or tiles on the range hood to create a focal point in your kitchen. Choose from a variety of materials such as wood, stainless steel, or even glass for a stunning visual effect.
- Add trim or molding to the edges of the range hood to create a more finished and polished look. This can help tie in with other design elements in your kitchen, such as cabinetry or countertops.
- Consider adding decorative accents such as metal straps, rivets, or scrollwork to give your range hood a touch of elegance or rustic charm.
- Experiment with different paint finishes, such as metallic or textured paints, to create a unique and eye-catching look. This can add depth and visual interest to your range hood.
Customizing The Range Hood With Unique Design Choices:
Make your curved range hood stand out by customizing it with your own design choices. Here are some ideas to get you started:
- Incorporate patterns or stencils onto the range hood for a personalized touch. This can be done using paint or even etching techniques.
- Experiment with different colors or color combinations that complement your overall kitchen design. Don’t be afraid to think outside the box and try bold or unexpected hues.
- Consider adding a decorative corbel or bracket underneath the range hood to create a striking visual element. This can also add an architectural touch to your kitchen space.
- Play around with different shapes and designs for the range hood itself. From curved or arched tops to unique cutouts, the possibilities are endless.
Incorporating Lighting Features:
Proper lighting can enhance the overall look and functionality of your curved range hood. Here are some ways to incorporate lighting features:
- Install LED lights underneath the range hood to provide task lighting for your cooking area. This will not only illuminate your stove but also create a warm and inviting ambiance in your kitchen.
- Consider adding accent lighting above or around the range hood to highlight its unique design features or decorative elements. This can create a focal point and add visual interest to your kitchen space.
- Opt for adjustable lighting options that allow you to control the brightness and color temperature. This will give you more flexibility in creating the perfect lighting environment for different occasions.
Installing A Range Hood Cover For A Sleek Look:
To achieve a sleek and seamless appearance, consider installing a range hood cover. Here’s what you need to know:
- A range hood cover is a custom-built enclosure that hides the actual range hood itself, giving your kitchen a clean and streamlined look.
- The cover can be made from various materials such as stainless steel, wood, or even glass, depending on your preferences and overall kitchen design.
- It’s important to ensure proper ventilation when installing a range hood cover. Consult a professional to ensure that your range hood is still able to effectively remove cooking odors and smoke from your kitchen.
- A range hood cover can also provide additional storage space by incorporating shelves or cabinets into its design. This allows you to keep cooking utensils or other kitchen essentials within easy reach.
By following these steps and incorporating your own unique design choices, you can create a curved range hood that not only functions efficiently but also becomes a stunning focal point in your kitchen.
Maintaining And Cleaning Your Curved Range Hood
When it comes to maintaining and cleaning your curved range hood, follow these steps to ensure it stays in top shape. Clean the filters regularly, wipe down the exterior, and check for any signs of damage or wear. Additionally, avoid using abrasive cleaners or harsh chemicals that could damage the surface.
Regular maintenance tasks for optimal performance:
- Clean the grease filters: Remove and wash the grease filters regularly to prevent grease buildup, ensuring efficient airflow.
- Check the fan and motor: Inspect the fan and motor for any dust or debris accumulation, and clean if necessary to maintain proper functioning.
- Test the lighting: Regularly check the bulbs in your range hood and replace any that have burned out to ensure good lighting while cooking.
Cleaning tips for different range hood materials:
Stainless steel:
- Use a soft cloth or non-abrasive sponge: Wipe the stainless steel surface with a damp cloth or sponge using mild dish soap.
- Dry thoroughly: After cleaning, make sure to dry the surface completely to avoid water spots or streaks.
Glass:
- Clean with a glass cleaner: Spray a small amount of glass cleaner onto a microfiber cloth and gently wipe the glass surface, removing any smudges or fingerprints.
- Polish for a shine: Use a separate dry microfiber cloth to buff the glass surface, leaving it gleaming and free from streaks.
Wood:
- Use a mild wood cleaner: Apply a small amount of wood cleaner to a soft cloth or sponge, then wipe the wood surface, following the grain to remove any dirt or stains.
- Avoid excess moisture: Ensure that the wood surface is not overly damp while cleaning, as excessive moisture can damage the wood finish.
Troubleshooting common issues and solutions:
- Excessive noise: Check for loose parts or debris in the hood. Tighten any loose screws and remove any debris that may be causing the noise.
- Ineffective ventilation: Ensure that the range hood is properly connected to the ductwork and that there are no obstructions blocking the airflow.
- Foul odors: Clean the filters and surfaces thoroughly to remove any accumulated grease or food particles that may be causing the unpleasant smell.
Extending the lifespan of your curved range hood:
- Regular cleaning: Keeping the range hood clean from grease and dirt will help prolong its lifespan and maintain optimal performance.
- Proper ventilation: Ensure that the range hood is installed correctly and connected to an appropriate duct system to prevent the buildup of excess moisture.
- Avoiding harsh chemicals: Use mild cleaning agents and avoid abrasive materials or cleaners that could damage the hood’s surface.
Recap of the key steps in building a curved range hood:
- Measure and choose the materials: Determine the appropriate dimensions and select the materials for your curved range hood.
- Cut and shape the materials: Cut the materials to the desired size and shape, following the specific design for your curved range hood.
- Assemble and install the range hood: Attach the different components together, ensuring a secure and stable installation.
- Connect to the ventilation system: Properly connect the range hood to the ductwork to facilitate effective air circulation and ventilation.
Benefits of a well-designed and functional range hood:
- Improved air quality: A range hood helps remove steam, smoke, and cooking odors, keeping the air in your kitchen fresh and clean.
- Grease and stain prevention: Effective ventilation can prevent grease buildup on surfaces and cabinets, reducing the need for frequent cleaning.
- Enhanced safety: Proper ventilation eliminates the risk of harmful gases, such as carbon monoxide, lingering in your kitchen during cooking.
Inspiration for incorporating a curved range hood into your kitchen design:
- Modern elegance: A curved range hood adds a touch of sophistication and elegance to any kitchen, creating a visually appealing focal point.
- Space-saving design: The unique curved shape allows for better space utilization, making it ideal for kitchens with limited overhead space.
- Seamless integration: A curved range hood can seamlessly blend with various kitchen designs, whether it’s a contemporary or traditional style.
Frequently Asked Questions On How To Build A Curved Range Hood
Can A Range Hood Vent Have Bends?
Yes, a range hood vent can have bends.
What Is The Best Shape For A Range Hood?
The best shape for a range hood is typically a traditional canopy shape.
What Can You Use Instead Of A Range Hood?
You can use a kitchen exhaust fan or a downdraft vent as alternatives to a range hood.
How Much Does It Cost To Build A Custom Range Hood?
The cost of building a custom range hood varies and depends on factors such as materials, size, and design.
Conclusion
Building a curved range hood can be a challenging but rewarding project for any DIY enthusiast. By following the step-by-step process outlined in this blog post, you can create a stunning and functional centerpiece for your kitchen. The key is to start with accurate measurements and carefully plan the design.
Whether you choose to use wood, metal, or a combination of materials, ensure that you have the necessary tools and equipment on hand. Don’t be afraid to seek out professional advice or assistance if needed. And remember, proper ventilation is crucial for maintaining a healthy kitchen environment.
By building a curved range hood, you not only enhance the aesthetics of your kitchen, but also improve air quality and minimize cooking odors. So roll up your sleeves, get creative, and enjoy the satisfaction of completing this unique and useful project.